17.7.1 Formation of multilayered porous structure by hot pressing
17.7.2 Formation of multi core-in-sheath porous Ti-MIM parts by sequential injection molding
17.7.3 Formation of steamed bread-like porous structures by coinjection molding
Porous materials are generally unsuitable for machining, for example cutting and polishing, because the porous structure on the surface is damaged by plastic deformation; also the machining cost is relatively high. Porous metal parts are rather only suited to net-shape manufacturing, namely powder sintering, as the only possible process. The manufacture of net-shape products with a highly dense microporous structure through PSH-MIM usually requires high-dimensional accuracy (±0.05%), similar to the accuracy required in machined parts (±0.01%). The effects of combinations of size and fraction of space-holder particles on the dimensional error and its coefficient of variation are shown in this section. Two types of test specimen with microporous structures are prepared by injection molding and extrusion molding to evaluate the effect of shape complexity on the dimensional accuracy achieved.
The porous compounds used for the experimental material were prepared by mixing PMMA particles (D50=10, 40μm) with MIM feedstock composed of stainless steel 316L powder (D50=3μm) and binder (paraffin wax and polyacetal polymer). As shown in Table 17.6, the fractions of PMMA particles to MIM feedstock are 0, 30, and 60 vol%, and the solids loading of MIM feedstock is 50 vol%. Using these porous compounds, two types of test specimen were fabricated by different molding methods, as shown in Fig. 17.25. A small impeller part was manufactured by injection molding (Fig. 17.25A) and the plate specimen was produced by extrusion molding (Fig. 17.25B). The dimensions of an impeller part are DD¼6.38mm in outside diameter and hD¼2.28mm height of the green compact. The plate specimens were cut at L=65mm, W=65m from longitudinal green sheet just after extrusion. The shrinkage after molding of both specimens is approximately 1%-2% in each dimension. The debinding and sintering of these green compacts were sequentially carried out at 400℃ for 2 h in N2 and at 1200℃ for 2 h in an Ar gas atmosphere under the heating conditions shown in Fig. 17.26.
Table 17.6 Experimental constituent materials and compositions
316L metal powder | Binder | PMMA particle | |||
Particle size (μm) | Fraction (vol%) | Fraction (vol%) | Particle size (μm) | Fraction (vol%) | |
Dense | 3 | 50 | 50 | - | 0 |
Closed cell | 3 | 35 | 35 | 10 40 | 30 |
Open cell | 3 | 20 | 20 | 10 40 | 60 |

Fig. 17.25 Test specimens and locations for dimensional measurement: (A) impeller by injection molding; (B) plate specimen by extrusion molding
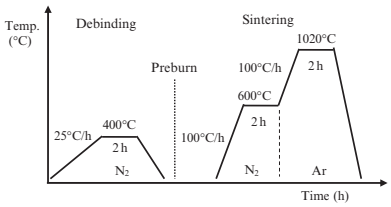
Fig. 17.26 Temperature control condition in debinding and sintering processes
The SEM images of the impeller produced, using the porous compound with added 60 vol% of 10μm PMMA particles are shown in Fig. 17.27. In macroscopic observation, the shape appeared accurately molded to the edges of the impeller blade. Microscopic observation also showed that the open pores were uniformly distributed on all surfaces of the sintered part and the pore size was approximately several micrometers.

Fig. 17.27 SEM images of impeller with microporous structures
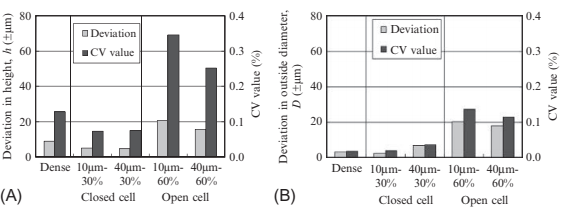
Fig. 17.28 Dimensional deviation and its coefficient of variance of impeller specimens: (A) height and (B) outside diameter
Table 17.7 Dimensional deviation and coefficient of variance of plate specimens
Average | Deviation | CV | ||
Width, W Length, L Height, h Weight, m Porosity, P | 48.15mm 47.23mm 1.37mm 11.64 g 52.55% | ±0.66mm ±0.70mm ±0.05mm ±0.08 g ±1.51% | (±1.37%) (±1.47%) (±3.65%) (±0.67%) (±2.88%) | 0.51% 0.45% 0.96% 0.32% 1.38% |
Dimensional deviation and its coefficient of variance (CV) value for the outside diameter and height of the impeller specimen are shown in Fig. 17.28. The materials used for porous MIM compounds of various composition are listed in Table 17.6. In the case of closed porous specimens to which 30 vol% of 10μm PMMA particles were added, dimensional deviations and their CV values are small and similar to dense specimens. Height directions showed higher-dimensional accuracy than diametric dimensions. It is supposed that this is due to the size effect, i.e., the dimensional relation between outside diameter and height of the specimen (D/h=3), but not due to the effect of flow direction and opening of the mold.
Furthermore,the dimensional deviations andtheirCV values of open porous specimen with added 60 vol% of 10μm PMMA particles are a few times larger than that of closed porous ones. The main reason for this is that open porous specimens shrunk more during sintering, because a large amount of PMMA particles were added to the MIM feedstock. Consequently, the PSH-MIM process is capable of manufacturing microporous metal parts with controlled 20μm pores with less than 0.4% CV value in both directions.
Dimensional deviation and CV values of the plate specimens produced by extrusion molding are shown in Table 17.7. The results showed no significant differences in accuracy between width and length dimensions. This means that the extruding force had no influence on the dimensional accuracy compared to a one-directional flow of green sheet. The in-plane isotropic property is useful for manufacturing porous parts by extrusion molding. Importantly, however, a lower-dimensional accuracy in height was obtained because of the size effect. Also the deviation and CV value in weight and porosity were not sufficiently small. The overall production quality, however, reached the same level as in conventional MIM, despite the green sheet being aired out from the die by extrusion and the microporous structure being unstable after debinding.
A comparison of deviation and CV values in dimensions and weight of porous specimens produced by injection molding and extrusion molding is shown in Fig. 17.29. To the porous compound, 60 vol% of 10μm PMMA particles were added. The impeller specimen produced by injection molding obviously attained higherdimensional accuracy than the plate specimen produced by extrusion molding. This is because injection molding can manufacture green compacts with high density, as the molding pressure is applied uniformly in the cavity. However, a converse result was obtained for deviation and CV values in weight. This might be explained by the difference in shape complexity.
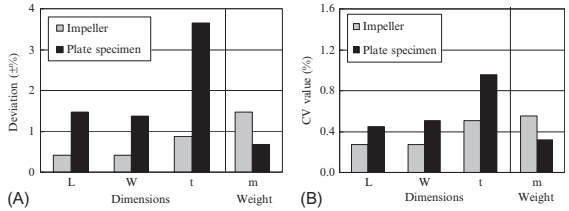
Fig. 17.29 Comparison in MIM impeller and extrusion plate: (A) dimensional deviation and (B) coefficient of variance.
From the previously mentioned measuring results on dimensional accuracy, it can be concluded that the PSH method could manufacture commercially microporous metal components with high-dimensional accuracy in both injection molding and extrusion molding. The dimensional accuracy for closed porous structured parts is less than several micrometers and therefore the same as in dense MIM parts production, while that of open porous structured parts is within several tenths of microns. The porosity can be controlled within several percent of deviation.
Mechanical properties of porous specimen are much lower than those of dense specimens. This is because the true cross-sectional area is incomparably lower in the porous specimen. This strength reduction is a main point of disadvantage in porous materials, and therefore an effective method should be considered for enhancing the strength of porous components.
It is well known in structural design of composites that sandwich structures show good performance in specific moduli and specific strengths. The authors tried to produce multilayered specimens with a graded porous sandwich structure. The effectiveness of the method to compensate for the deficiencies in mechanical properties was investigated for porous metals in comparison with materials with a homogeneous dense and porous structure. Cosintering was applied to form the graded porous structures after each porous compound was consolidated by sequential hot press molding. The multilayer metals were obtained by changing the stacking sequence in the cosintering process. The skin layer and core were formed with a highly dense structure and a microporous structure, respectively and conversely.
Fig. 17.30 shows a cosintering production process of multilayered metals with graded porous structures (Nishiyabu et al., 2005, 2005a, 2005b). Using dense MIM feedstock and porous compounds with various contents of space-holding particles, circular shapes of green compacts (40mm diameter, 2mm thick) were prepared by hot press molding for the sake of simplicity in these experiments, but could also have been produced by injection molding. The molding was carried out under constant conditions where die temperature and gauge pressure were 200℃ and 10MPa, respectively. The debinding and sintering were sequentially processed at 600℃ for 2 h in N2 and at 1050-1200℃ for 2 h in Ar gas atmospheres in the vacuum furnace to avoid oxidizing.

Fig. 17.30 Production process of multilayered metals with graded porous structures
Fig. 17.31 shows SEM images of graded porous metals produced by cosintering the laminated green compacts, which were stacked in five plates with various contents of PMMA particles in several sequences, namely (A) dense surface graded structures and (B) porous surface graded structures. These SEM images revealed the macroscopically graded porous structures and showed that no defects appeared in the interfacial region between each layer.
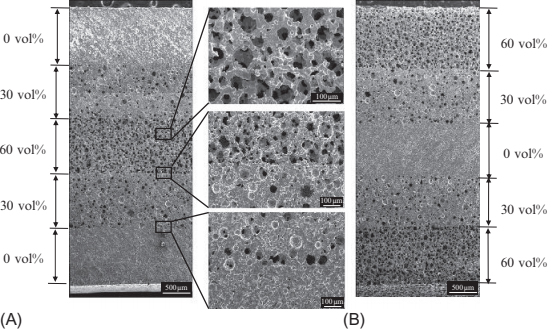
Fig. 17.31 Porous graded structures produced by cosintering laminated green compacts: (A) dense surface graded structure; (B) porous surface graded structure
Fig. 17.32 shows the bending stress-strain curves and bending modulus of plain porous specimens and graded porous ones. A three-point bending test was carried out for short beam specimens (5×10×40mm) and test conditions in reference to ISO178 standards. Bending strain was calculated by elastic theory using span length and height of specimen in addition to defection at loading point. In the case of the plain porous specimens, the ultimate stresses on specimens with 30 and 60 vol% PMMA particles were very low, and the bending strength and modulus decreased drastically with increasing fractions of PMMA particles.
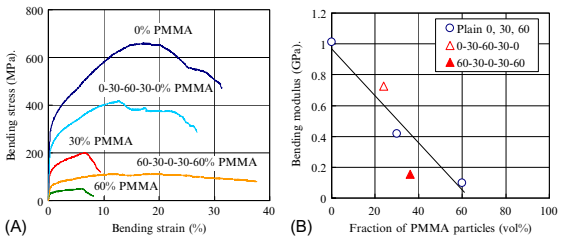
Fig. 17.32 Bending properties of specimens with various fractions of PMMA particles: (A) bending stress-strain curves; (B) bending modulus
The behavior can also be observed from fracture behavior shown in Fig. 17.33. Brittle fracture occurred due to rapid fracture propagation in the upper tensile side. On the other hand, both graded porous specimens show a strong deformation behavior, as with the dense 0 vol% PMMA specimen. Definite differences in bending modulus appeared between type (a) 0-30-60-30-0 and type (b) 60-30-0-30-60 specimens. The bending modulus is higher for type (a) specimen and is lower for type (b) specimen than expected. This is because the cracks occurred in the lower skin layer with the open porous structure, which was subjected to tensile load, in the type (b) specimen. Thus, definite differences were shown in mechanical properties between the plain porous structure and the sandwich structure. Therefore, it is concluded that this proposed manufacturing method is effective for material design combining material features on the micro- and the macroscales.
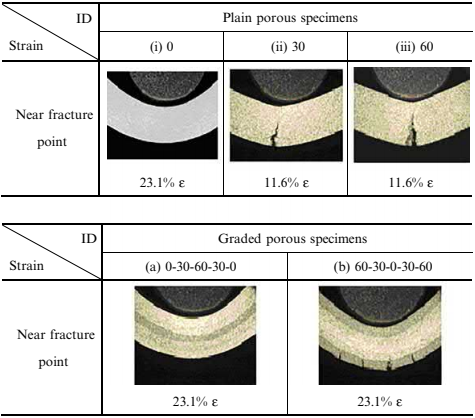
Fig. 17.33 Fracture aspects of specimens with various fractions of PMMA particles under bending load
Pure titanium was chosen for the experiments as the representative materials of medical implants. The aim of this study is to demonstrate the feasibility and effectiveness of MIM in producing multilayered porous metal components. Hollow, thick-walled cylindrical structures with three layers of various porosities were molded by sequence metal powder injection molding. Pore formation and some physical properties of the sintered porous specimen were investigated. The specimens were produced using porous compounds prepared in changing fractions of space-holding particles. It was confirmed that the method proposed in this study was useful in producing the metal components with microsized pore and multilayered structures.
The possibility of dental implants for functionally disordered hard tissues like bone and teeth have received a lot of attention recently, in addition to substituting hard tissue instrumentations like artificial bones, artificial hip joints and artificial teeth. Pure titanium (Ti) has been the most widely used metal for orthopedic implant material to date because of its excellent combination of biocompatibility, corrosion resistance to acid, salt water and blood, and mechanical properties, such as low specific gravity and high strength. However, Young' modulus of pure Ti (110 GPa) is much higher than that of human bone (12-23 GPa). Critical problems caused by the mismatch of elastic modulus between implant and human bone are still unresolved. One way to alleviate the problems is, therefore, to reduce Young' modulus of pure Ti by introducing pores, thereby minimizing damage to tissues adjacent to the implant and eventually prolonging device life. Sintered porous Ti compacts having Young' modulus close to that of human bone have been developed. Porous compacts having a porosity of 19-35 vol% were fabricated using pure Ti powder with 300-500μm particle sizes. Porosity-graded Ti compacts were investigated using Ti powders with three different particle sizes: 65,189 and 374μm.
Looking at practical production, Ti implants have very complicated shapes, including core structures of high durability and surface structures of high osteogenesis. It is therefore necessary to manufacture those products with high-dimensional accuracy and high reliability in terms of strength. However strongly desired these microporous metal components may be for high functioning applications in medical implants, not many studies deal with their cost-efficient net-shape production. The sequential injection molding method was used for producing multilayer porous structured parts. In the first step, inner material was molded into the die (2 and 4mm in inside and outside diameter), in the second and third steps, middle and outer materials were overmolded after having inserted the overmolded parts in turn. Three layers of structural green compacts with 2mm layer thickness were obtained using dense MIM feedstock and porous compounds with various fractions of PMMA particles. The metal powders are pure Ti produced by the gas-atomization method. The multicomponent binder is formed from polyacetal polymer and wax. Spherical particles (180μm in mean diameter) made of PMMA were used for holding the space. These materials were comixed and pelletized with a high-pressure kneader and plunger-type extruder. The fraction of PMMA particles varied from 0 to 65 vol% as the main experimental parameter.
To evaluate the physical properties of sintered porous Ti, the disc shape of the green specimen was compacted with hot-press forming, using a steel die 40mm in diameter. A sintered porous specimen with 33.4mm diameter and 2.6mm thick was obtained after debinding and sintering. Also, single-layer and multilayered porous pipes were prepared by injection molding using a die with a cavity size of 8mm diameter and 24mm high. Two types of multilayered specimen, namely 65-30-0 and 0-30-65, were prepared by changing molding sequence. Debinding and sintering were sequentially processed at 600℃ for 2 h in Ar and at 1200℃ for 2 h in 0.1MPa level high-vacuum atmospheres in a metal hot zone furnace.
Fig. 17.34 shows the surface structures of single-layered microporous Ti pipes with various fractions of PMMA particles. The highly dense sintered Ti pipe possessed high modulus and strength, but the sintered porous Ti pipe produced using 30 or 65 vol% PMMA particles had closed or open pores, respectively. Fig. 17.35 shows the surface structure of multilayered porous Ti pipe (65-30-0) produced by the sequential injection molding method. Open pores appeared in the outer cylindrical layer, and closed pores are visible in the middle layer. No defects are recognized in the interfacial region between each layer. Fig. 17.36 shows the porosity of single-layered and multilayered (65-30-0) microporous Ti pipes as a function of the fraction of PMMA particles. As the fraction of PMMA particles increases, the porosity increases linearly up to approximately 50 vol% of PMMA particles, where it is equivalent to a transition from a closed porous structure to an open porous structure. Therefore, it was confirmed that we were able to control the porosity of sintered bodies by the fraction of space-holding particles.
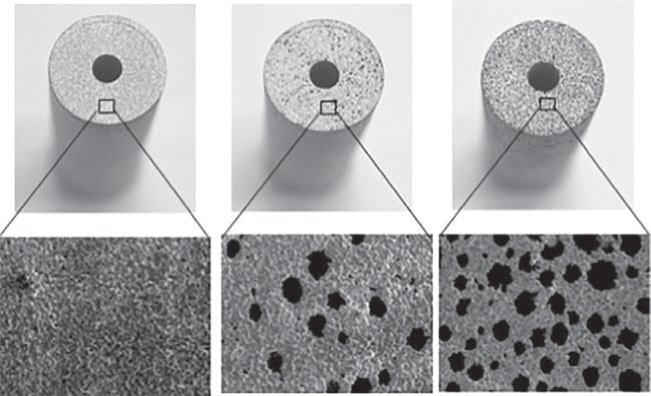
Fig. 17.34 Surface structures of single-layered porous Ti pipes with various fraction of PMMA particles: (A) 0 vol%; (B) 30 vol%; and (C) 65 vol%
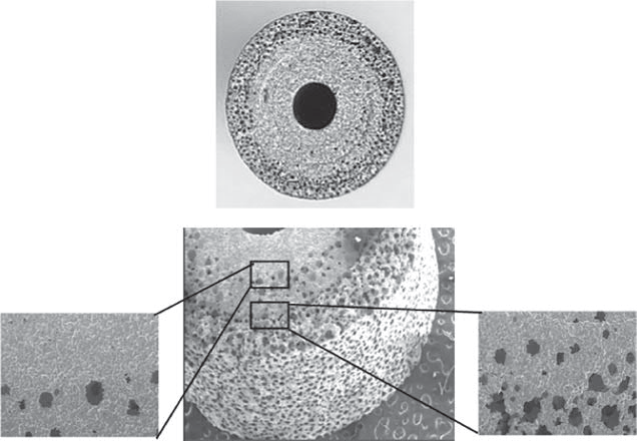
Fig. 17.35 Surface structure of multilayered porous Ti pipe: (A) 0-30 vol%; (B) overviews; and (C) 30-65 vol%
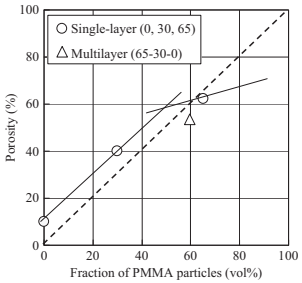
Fig. 17.36 Porosity of sintered porous Ti as a function of fraction of PMMA particles
Fig. 17.37 shows the axial compressive stress against strain curves of single-layered and multilayered (65-30-0) porous Ti pipes. In the case of single-layered porous Ti pipes, the highly dense specimen (0 vol% PMMA) shows high-yielding compressive strength, and is fractured in the shear mode, while the specimen with an open porous structure (65 vol% PMMA) deformed largely at low compressive stresses. Thus the yielding stress decreases drastically with increasing fraction of PMMA particles. On the other hand, multilayered porous Ti pipe shows a comparatively high compressive property, although an open porous structure exists on the surface.
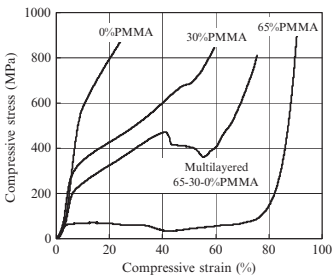
Fig. 17.37 Compressive stress against strain curves of singlelayered and multilayered (65-30-0) porous Ti pipes
These experimental results show that the MIM base powder space-holder method proposed in this study has great potential to realize net-shape manufacturing of microporous metal components with complex shape and multilayer structure. Furthermore, to advance the manufacturing method proposed, green compacts with graded content of space-holding particles were stacked by hot press molding and cosintering was applied to them to form graded porous structures. By comparing the mechanical properties of the materials with plain, homogeneous, porous specimens and porous graded structures, it was confirmed that, first, the desired functionally graded porous structures can be produced easily, and second, that graded porous structures were effective in enhancing the mechanical properties of porous metals. When this method was applied to injection or extrusion moldings, then a near-net-shaped production of metal components with complex three-dimensional shapes could be achieved.
The coinjection molding method is characterized by using a sandwich structure in porous MIM components. Coinjection molding of flat specimens applied to the hot runner system with a double gate, which could be injected sequentially, produced two kinds of materials. Fig. 17.38A and B exhibit cross-sections of the sandwich structure in longitudinal and lateral directions. The core material in dark color is visible in the center of the specimen, and the skin material, in light color, formed at about 200-300μm in thickness. When the fraction of PMMA particles is 30 vol%, the core material forms closed pores, while when the fraction of PMMA particles is 60 vol%, it forms open pores. From these photographs, observed by SEM, it is clearly shown that the boundary region between core (porous) and skin (dense) materials of sintered specimens is free from any defects. Fig. 17.39 shows the results of a bending test of the plain porous and sandwich porous specimen with various fractions of PMMA particles. The sintered specimens with sandwich porous structures showed higher bending strength than those with a plain porous structure.
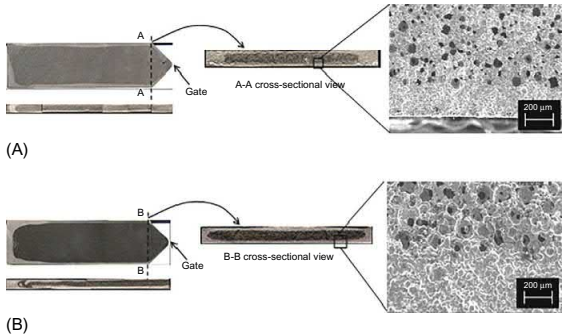
Fig. 17.38 Cross-sectional views of sandwich structure in longitudinal and lateral directions: (a) skin: 0 vol%/core: 30 vol% PMMA and (b) skin: 0 vol%/core: 60 vol% PMMA
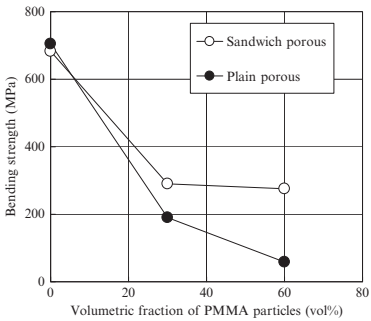
Fig. 17.39 Bending strength plotted by function of PMMA particle
It was confirmed that the PSH method was useful in producing metal components with microsized porous and high functionally graded porous structures. The feasibility of producing graded porous structures was confirmed when using cosintering, showing effective compensation for the mechanical deficiencies of porous structures.
The manufacturing method for microporous metal components using a PSH method together with a MIM process was presented in this study. From experimental results and simple geometrical analysis, it was concluded that porous metals with microsized pores could be formed homogeneously when two parameters were optimized: first, the particle size of the spherical materials supporting the metal powder, and second, the sintering temperature. The porosity could be easily controlled by the fraction of PMMA particles for space holding. The pore size is dependent on the particle size of PMMA. Surface area and resistance of a fluid to flow through sintered porous metals are significantly affected by the sintering temperature. The method could be applied to injection or extrusion moldings for the net-shaped production of microporous metal components with complex three-dimensional shapes.
Contact: Cindy Wang
Phone: +86 19916725892
Tel: 0512-55128901
Email: [email protected]
Add: No.6 Huxiang Road, Kunshan development Zone, JiangsuShanghai Branch: No. 398 Guiyang Rd, Yangpu District, Shanghai, China